1Password的最大优势是跨平台,不管是苹果系的iOS,macOS,还是Google的Android,微软的Windows,以及Linux,都能完美支持。让你在macOS上使用Safari,在Windows上使用Edge,Android上使用Chrome时,都能无缝得到密码管理的支持。这是苹果自带的密码管理所不能满足的。
如何使用好1Password,官方文档Get started with 1Password是最好的学习素材,快速浏览一遍,基本会使用完全没有问题。
这篇文档我只重点介绍在 macOS 和 iOS 上使用1Password时的一些注意事项。
安装
macOS和iOS上的Safari,都需要打开1Password插件。
macOS的Safari插件直接在App Store安装。
iOS上插件的安装请参考:Get to know 1Password for Safari on your iPhone or iPad
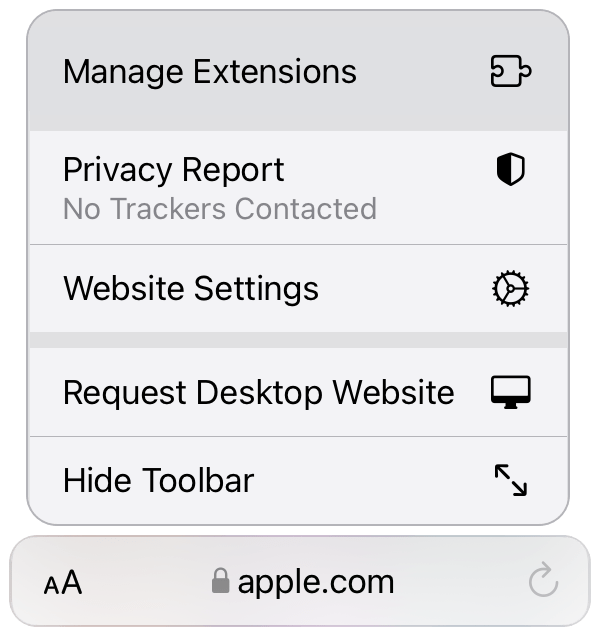
Open Safari to any website and tap
in the address bar.
If you’re using an iPad, tap
in the address bar.
Tap Manage Extensions and turn on 1Password, then tap Done.
关掉内置密码管理
由于Safari自带了密码管理,同时打开会和 1Password 有冲突,因此需要关闭内置的密码管理。
具体操作参考官方文档Turn off the built-in password manager in your browser。
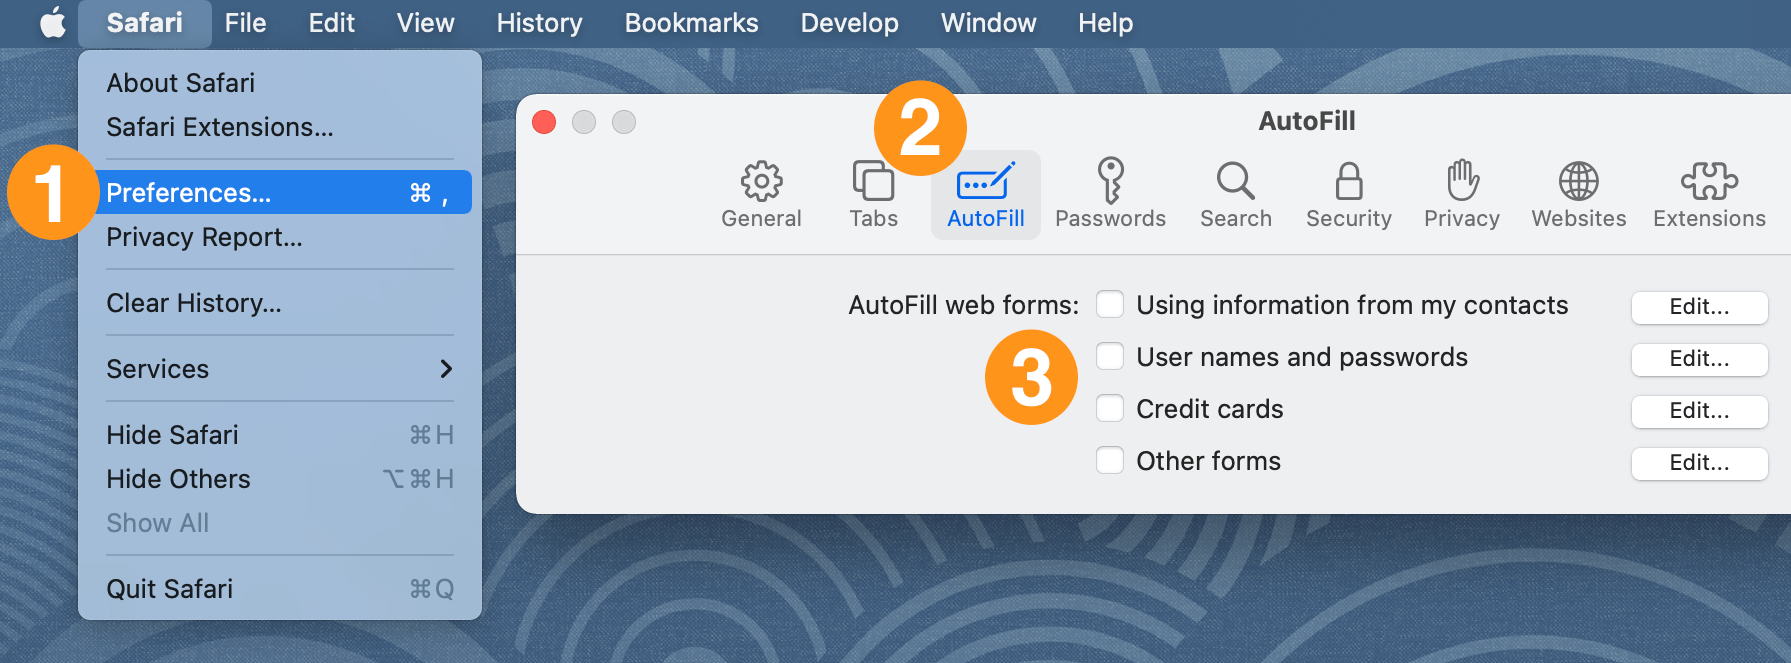
- macOS 上Safari的设置
To stop Safari from asking to save your passwords:
- Click the Safari menu and choose Preferences.
- Click the AutoFill icon.
- Turn off all the AutoFill web forms settings: “Using info from my contacts”, “User names and passwords”, “Credit cards”, and “Other forms”.
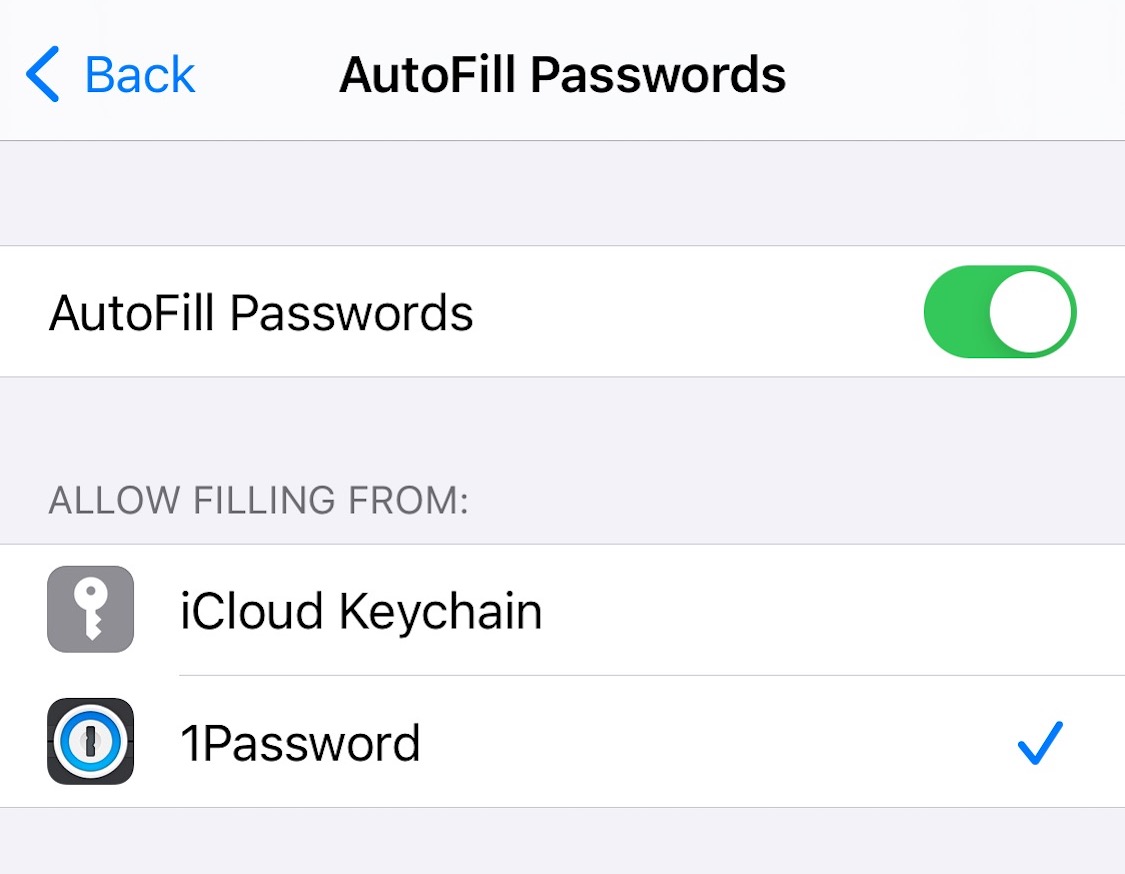
- iOS 上Safari的设置
To stop Safari from asking to save your passwords:
- Open Settings, then tap Passwords & Accounts.
- Tap AutoFill Passwords.
- Turn off iCloud Keychain.
iOS上App的支持
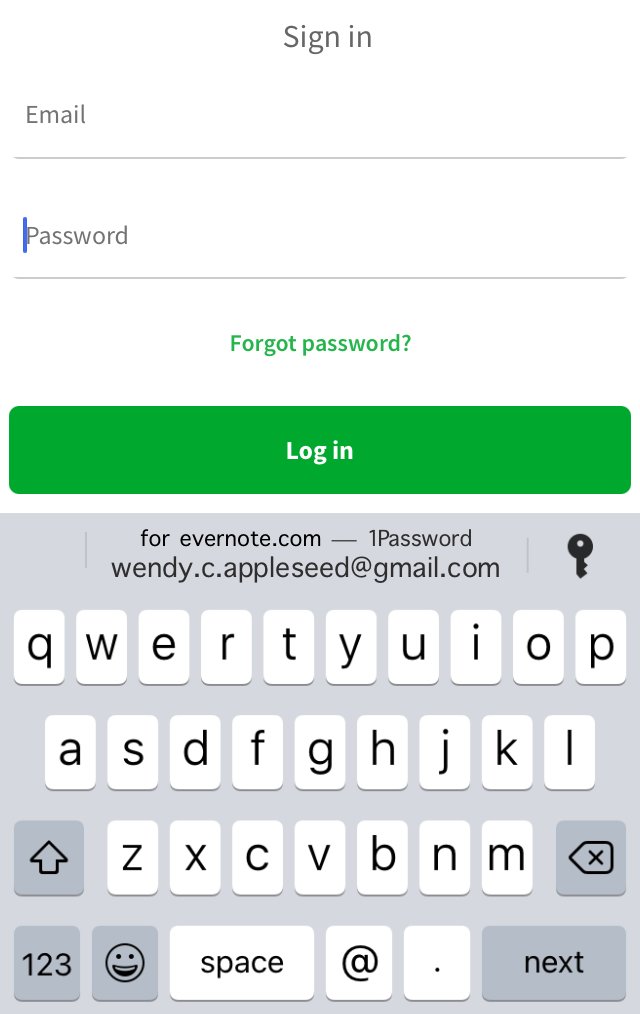
iOS上app使用 1Password 的体验和 Safari 是一致的,只要app使用iOS系统标准键盘,在需要输入用户名和密码的地方,会自动出现钥匙图标,点击钥匙,会呼出1Password进行自动填充。
然而很多国产银行类app,基本都不使用iOS内置键盘,所以没法呼出1Password。这时候只能自己进入1Password 进行拷贝密码或创建密码的操作。
Universal Autofill
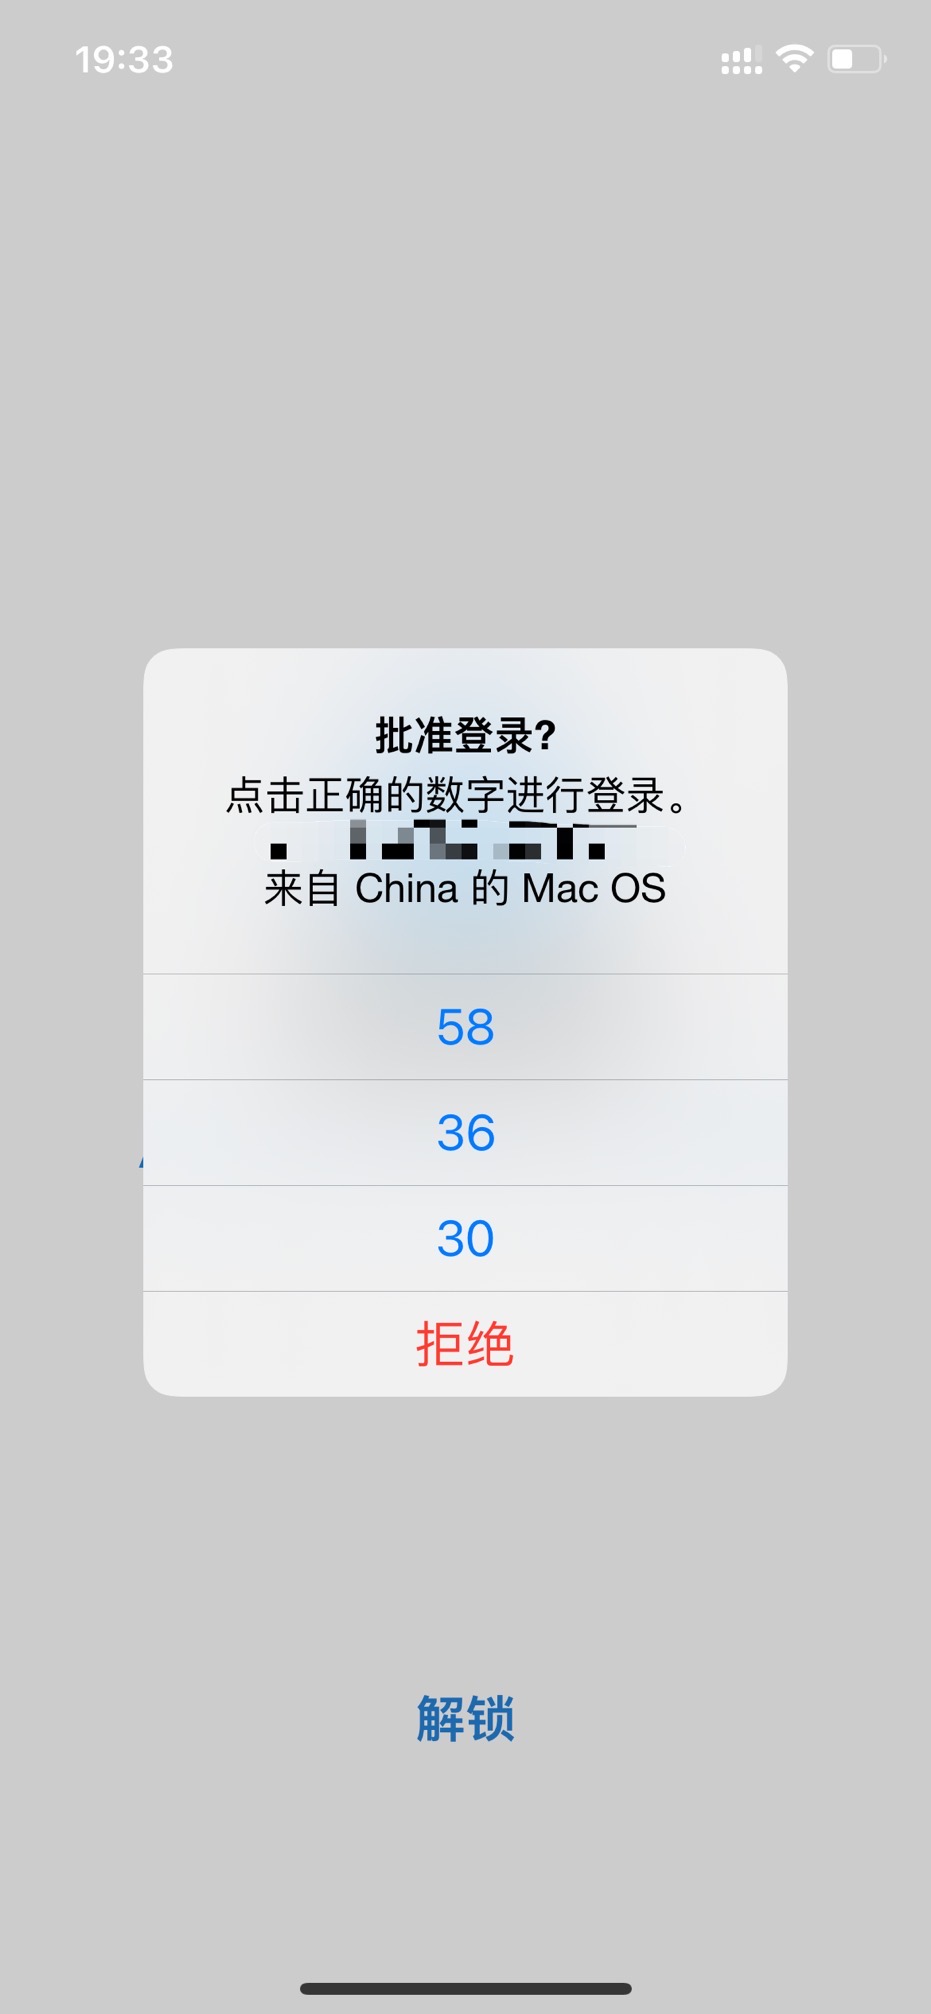
Universal Autofill 是 1Password 8的一个重大升级功能。Universal Autofill 实现了真正的「全局填充」。你只要记住一个快捷键 Command + \ ,就可以在浏览器、应用程序、终端和系统提示等任何地方,让 1Password 帮你自动完成密码填充。

两步认证
对于已经支持1Password 两步认证 的网站,都已经迁移到了1Password。
如果1Password本身开启了两步认证,它就需要一个第三方的Authenticator,因为它不可能自己保存自己的one-time password,官方文档已经说明。我选择了微软的Authenticator。
微软的Authenticator可以备份和恢复,在换手机时非常方便。另外使用 Authenticator 登录微软账号时体验很好,不需要输入密码,只用在手机上确认即可,体验类似扫码登录,但又不用扫码:)
管理SSH Keys
1Password 可以保存你的 SSH keys,并作为 SSH agent ,无缝整合 SSH 和 Git工作流。同时,在GitHub等平台需要填写公钥的地方,自动帮你拷贝填充公钥。
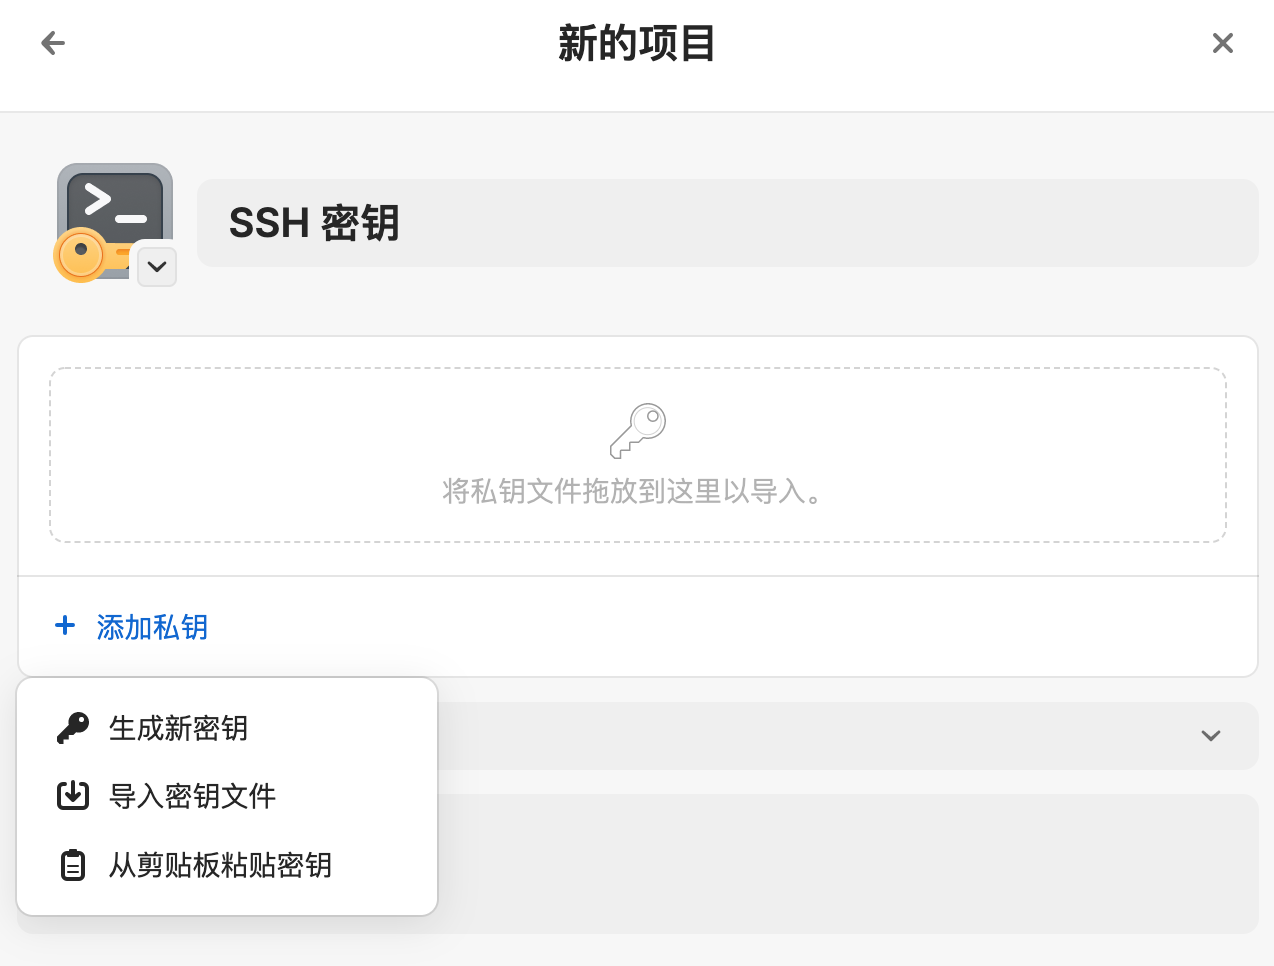
生成或导入SSH keys
我们可以使用 ssh-keygen 命令自己生成 SSH key,也可以在 1Password 中创建SSH key 项目时自动生成。
开启1Password SSH Agent
1Password SSH Agent 使用你保存在1Password中的 SSH Key,与你的Git和SSH工作流程无缝集成。它可以验证你的Git和SSH客户端,而这些客户端永远无法读取你的私钥。
首先要打开 1Password SSH Agent ,让它在后台运行,为你的SSH客户端处理认证。打开 1Password > 偏好设置 > 开发者,勾选 “使用 SSH agent” 和 “授权连接时显示密钥名称”。
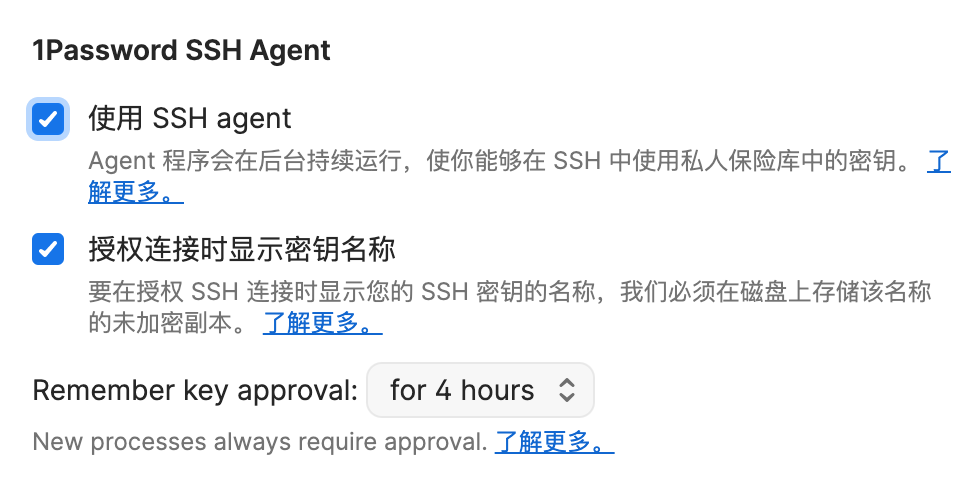
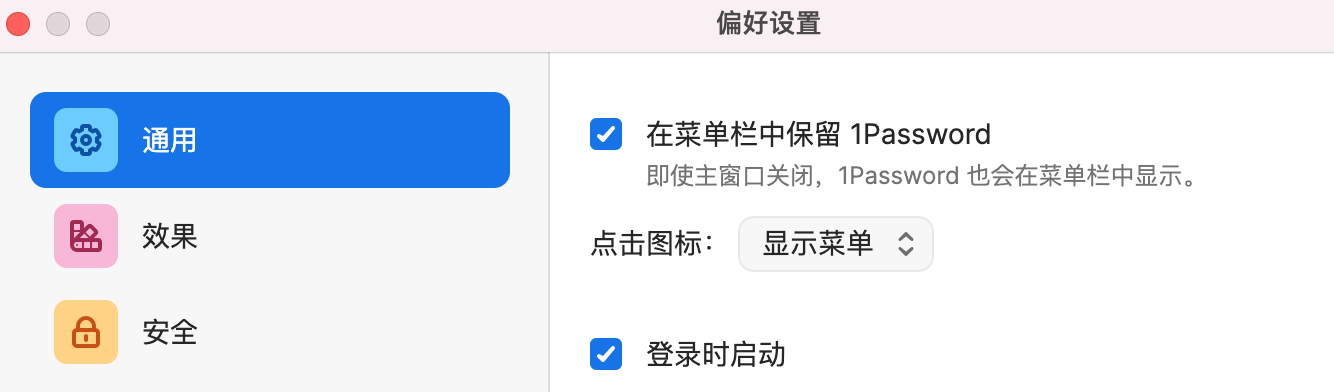
为了确保 SSH Agent 在后台持续运行,需要在 1Password > 偏好设置 > 通用 中,勾选 “在菜单栏中保留1Password”。
配置 SSH 客户端
为了让 SSH 客户端能使用1Password SSH agent,需要将 IdentityAgent 配置添加到 ~/.ssh/config文件中:
|
|
你也可以在 Shell 中设置 SSH_AUTH_SOCK 环境变量:
|
|
如果觉得agent 路径过于复杂,可以先创建一个符号链接:
|
|
这样就可以在设置环境变量时直接引用符号链接:
|
|
现在 SSH 客户端就可以在登录远程主机时使用1Password SSH agent。
可以使用下面的命令查看,1Password SSH agent 帮我们管理的SSH Keys:
|
|
发布 SSH 公钥
我们需要使用某种方式,将 SSH 公钥发布到远程服务器,以便对方能利用公钥验证你的身份。
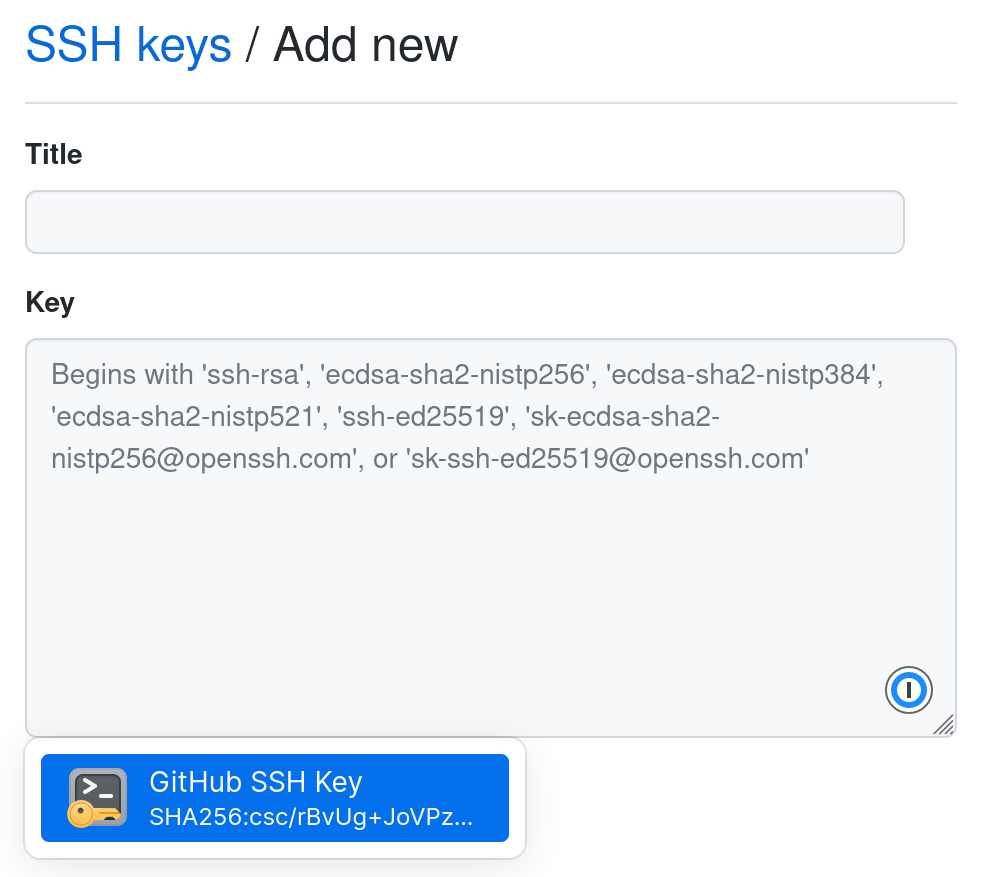
一种方式是把公钥上传到服务提供者的网站,将公钥和你的账号绑定。例如你可以在GitHub SSH key settings页面上传公钥。 腾讯云的管理控制台也可以上传你的公钥,然后将公钥和你购买的服务器绑定。在页面填写公钥时,1Password会像填充密码一样进行自动填充。
另一种方式就是使用 ssh-copy-id 命令,直接将公钥拷贝到远程服务器。
不管使用哪种方式,一定要记住你发布的是公钥,千万不能不小心泄漏了私钥。
管理 Github Signing Key
Github 开始支持使用 SSH Key 来签名提交,也就是说,我们可以用 1Password 管理的 SSH key 来签名 git commit。
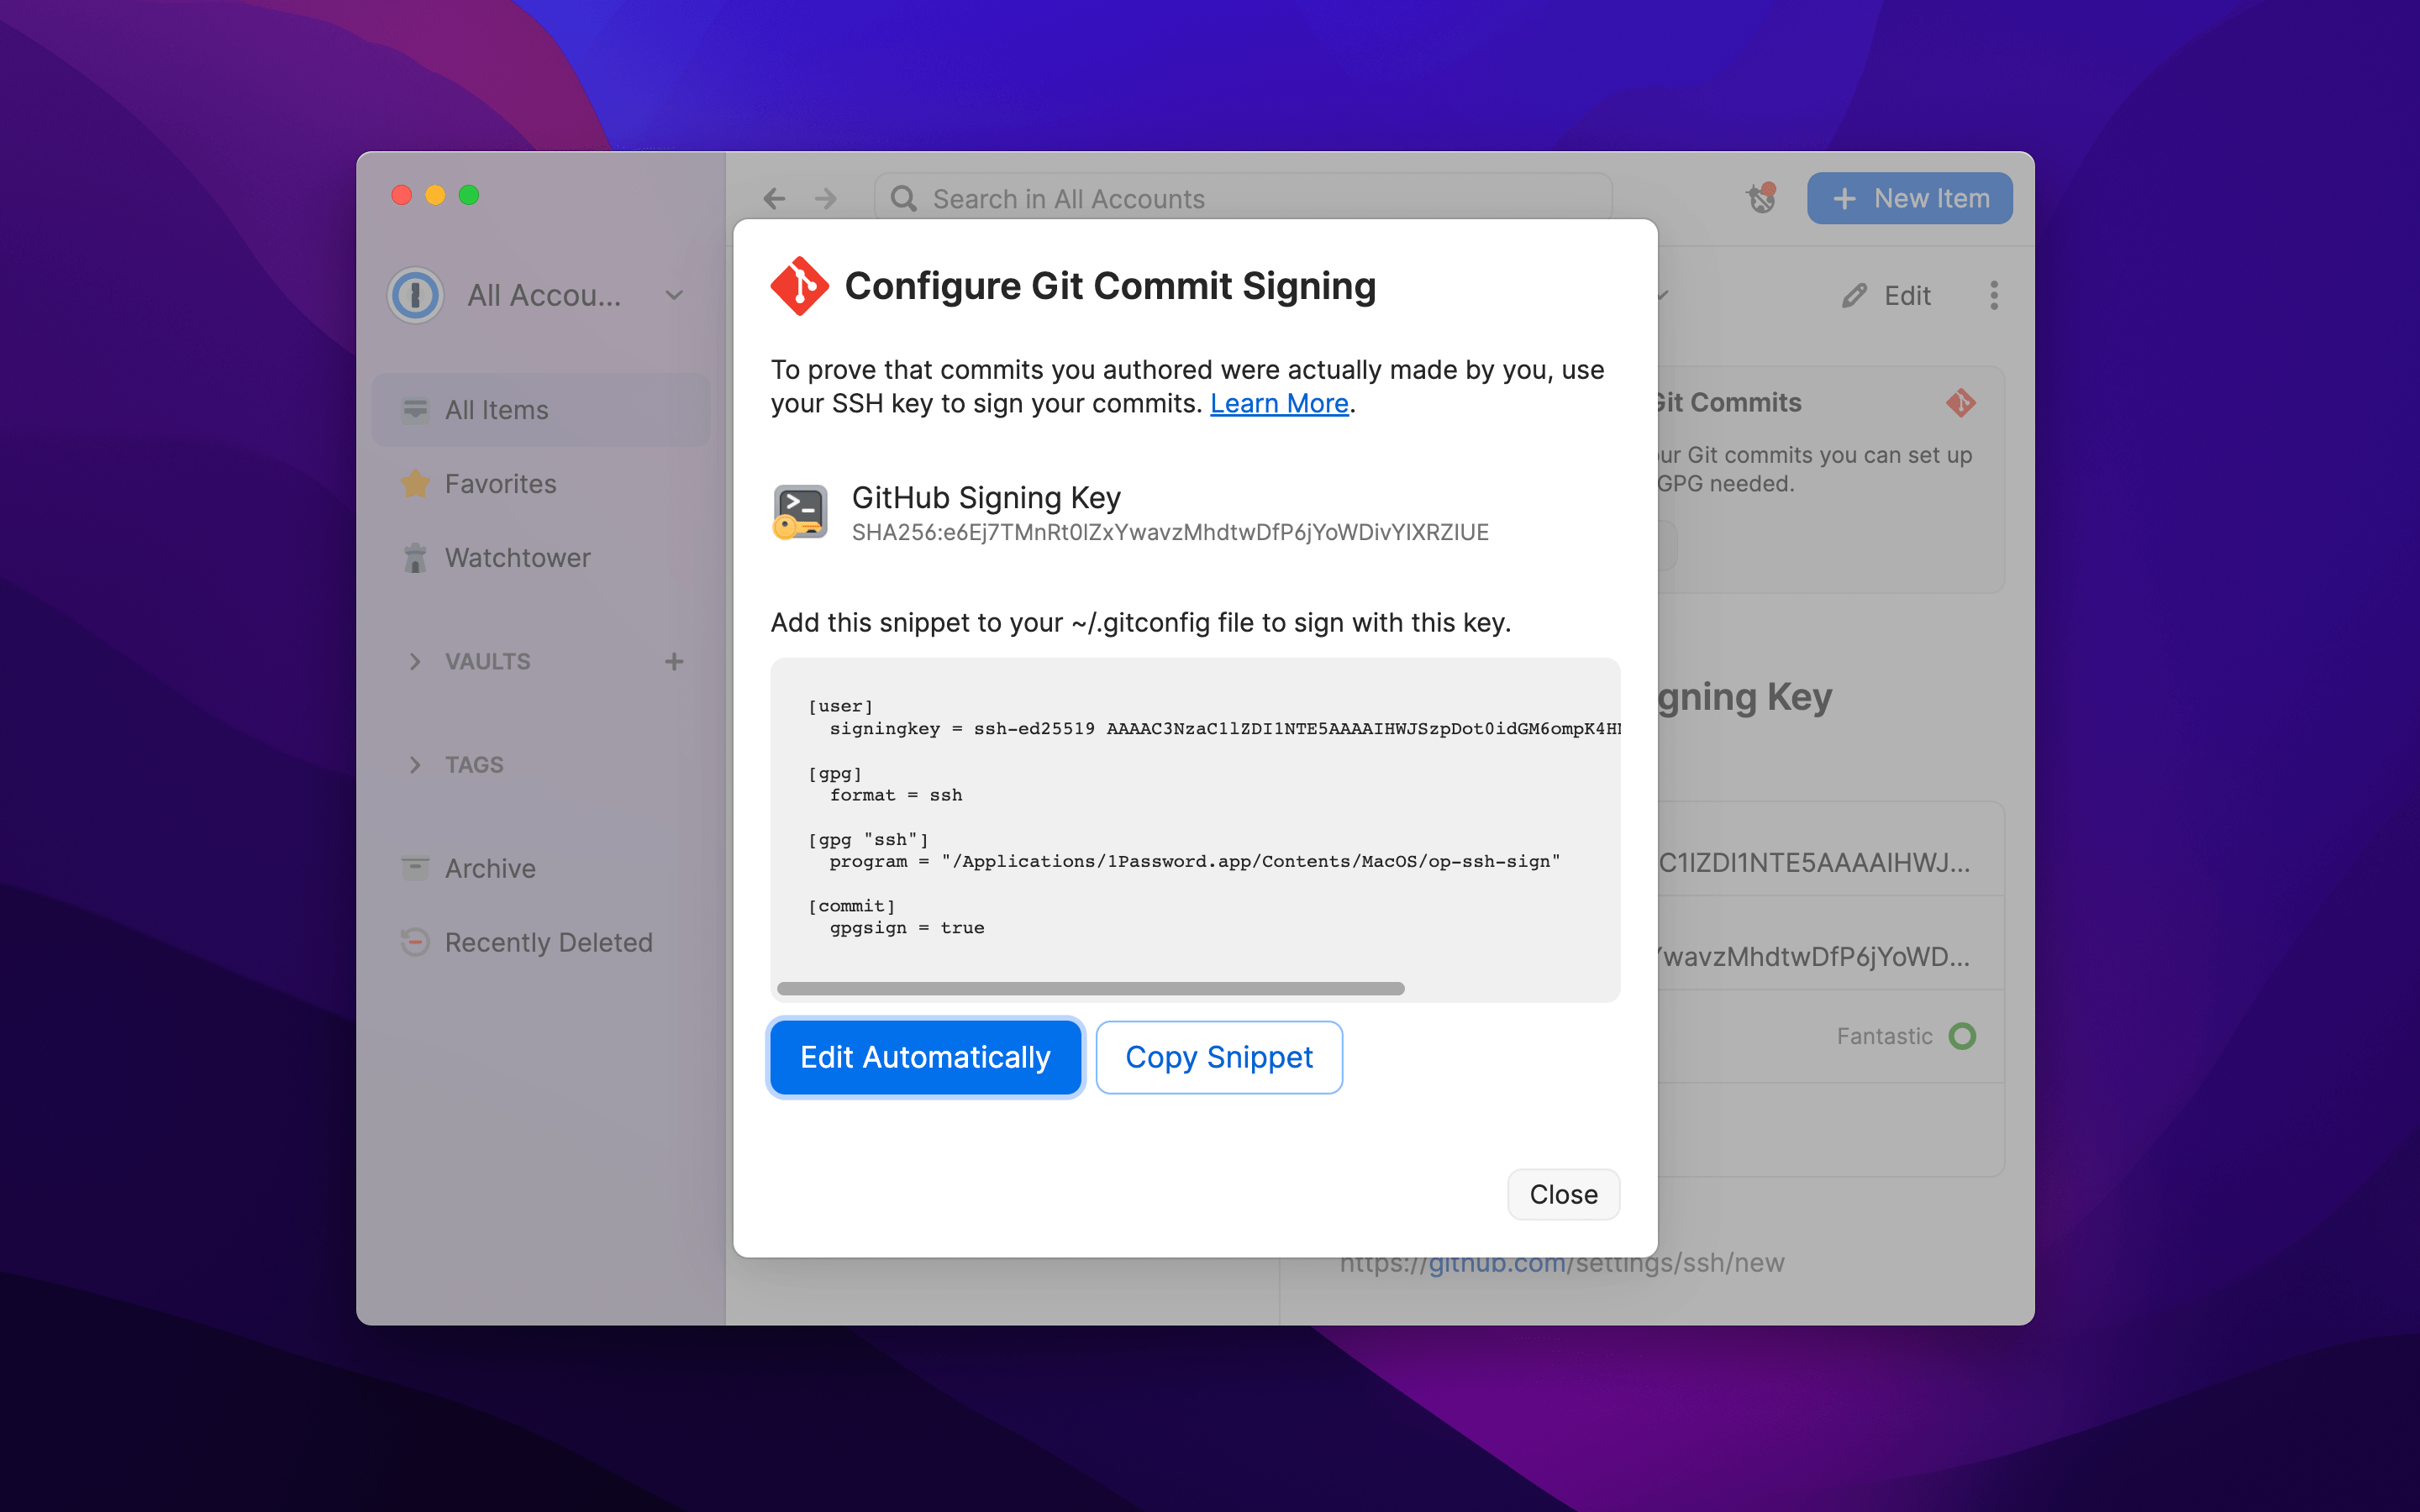
设置过程可以参考Sign your Git commits with 1Password,主要包含两个步骤:
- 在GitHub上生成Signing Key。访问https://github.com/settings/keys ,选择 “New SSH Key”,选择key的类型为 “Signing Key”,然后填入 1Password 管理的 SSH 公钥。

- 配置本地的
.gitconfig。在 1Password中,选择SSH Key,并在上面显示的横幅中选择 “配置 “选项:
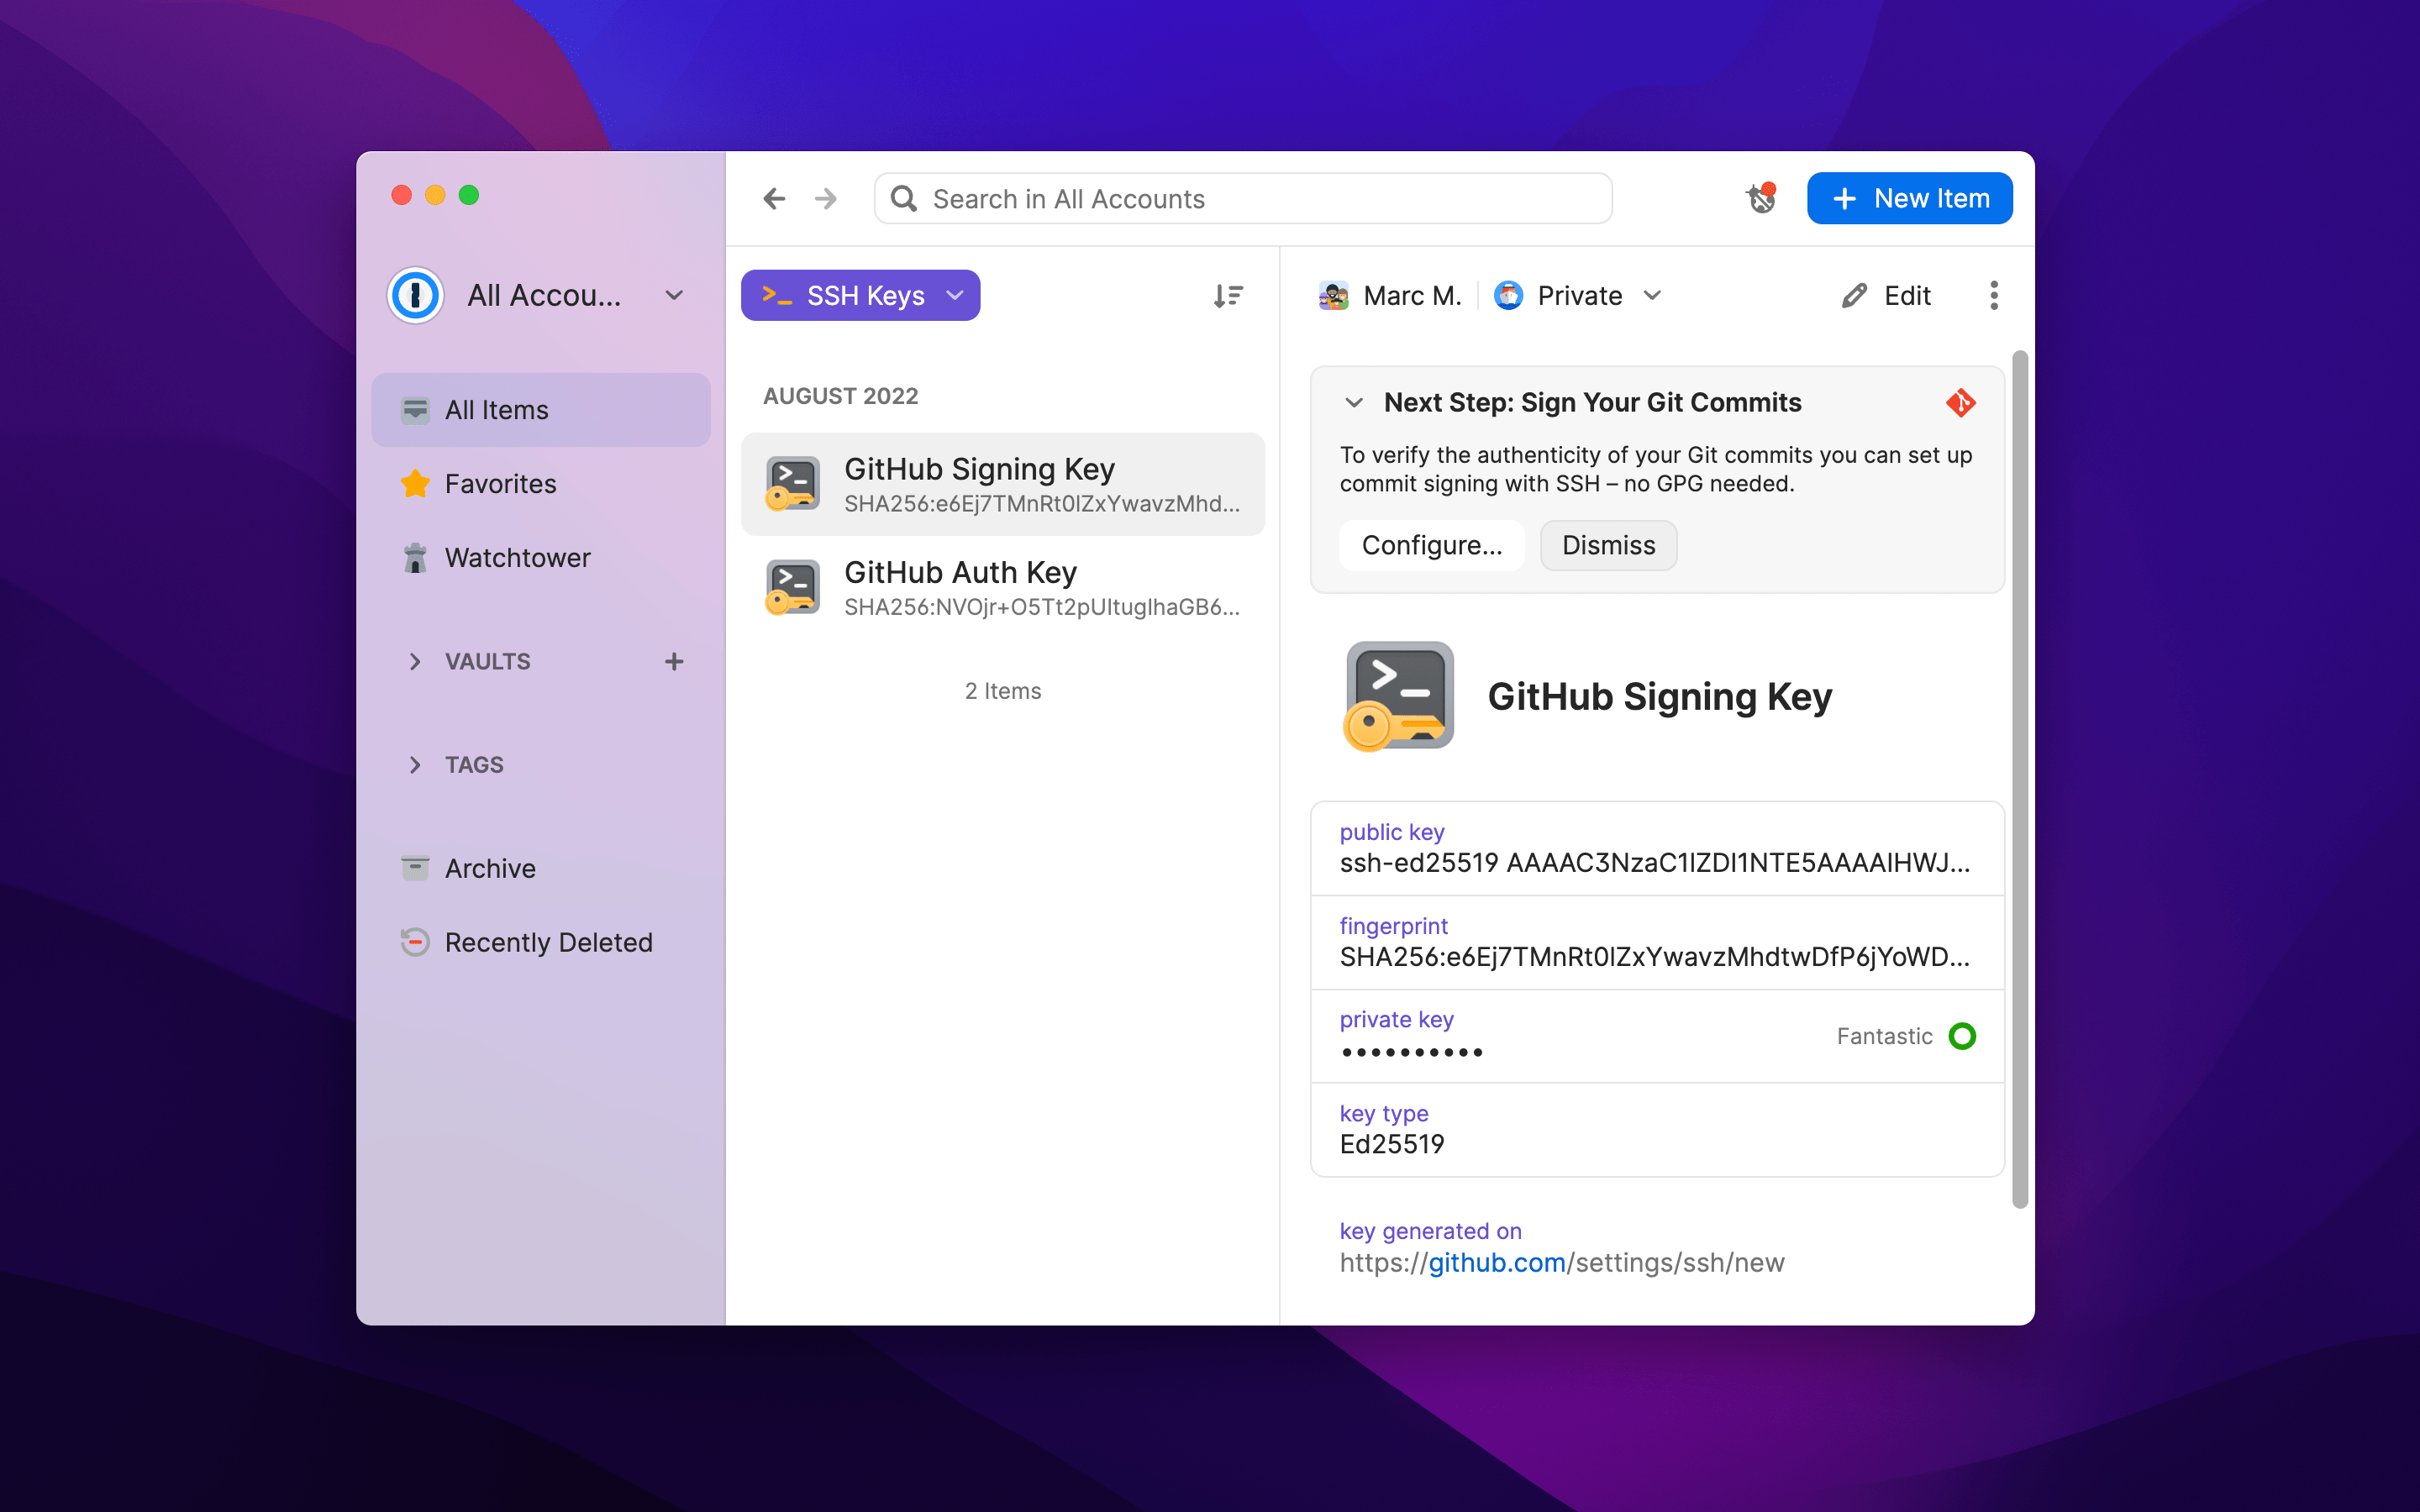
按照提示,配置你的 .gitconfig文件。这些设置选择了你的 SSH key,并在 git commit 的时候使用 SSH Key 签名。
“Sign in with” anything
1Password将记住用户使用的第三方登录服务(如 sign in with Google)。看官方消息,这个功能很快会上线。